

The holiday season is here, and if you’re anything like me, you want your nails to look absolutely stunning without breaking the bank. Good news: you don’t need to spend a fortune at the salon to achieve that luxe, festive look. With a few clever tricks and the right inspiration, you can create Christmas nail designs that look like they cost a fortune but actually don’t.
Whether you’re heading to holiday parties, family gatherings, or just want to feel festive while wrapping presents, these elegant holiday nails will have everyone asking where you got them done. Let’s dive into 12 gorgeous designs that prove expensive-looking nails are totally achievable at home!
Table of Contents
- Classic Red Chrome Elegance
- Gold Foil Accent Nails
- Minimalist Snowflake French Tips
- Deep Burgundy with Gold Striping
- Silver Glitter Gradient
- Glossy Candy Cane Stripes
- Champagne and White Marble
- Emerald Green with Rose Gold Details
- Simple Christmas Nails: Nude with Gold Dots
- Black and Gold Geometric Design
- Pearl-Studded Red Nails
- Icy Blue Snowflake Masterpiece
1. Classic Red Chrome Elegance

Let’s start with a timeless classic that screams luxury. Red chrome nails have that high-shine, metallic finish that looks incredibly expensive. The best part? Chrome powder is surprisingly affordable and easy to apply over any gel or regular polish base.
How to achieve this look:
- Apply two coats of red polish as your base
- Use chrome powder (available at drugstores for under $10) and buff it onto tacky gel polish
- Seal with a glossy top coat
The reflective metallic finish catches the light beautifully and looks like you spent hours at an upscale salon. This is hands-down one of the most elegant holiday nails you can create at home.
2. Gold Foil Accent Nails

Gold foil gives you that editorial, high-fashion vibe without any artistic skills required. The irregular, abstract pattern actually works in your favor—it’s supposed to look randomly placed!
How to achieve this look:
- Paint nails with a neutral beige or soft pink base
- On 1-2 accent nails, apply small pieces of gold leaf foil while the top coat is still tacky
- Press down gently and seal with another layer of top coat
This simple Christmas nails design is perfect for those who want something festive but not over-the-top. The gold catches the light at every angle, making your nails look custom-designed.
3. Minimalist Snowflake French Tips

French tips never go out of style, and adding tiny snowflakes takes them from classic to festive. This design is clean, sophisticated, and absolutely stunning.
How to achieve this look:
- Create traditional white French tips using tape as a guide
- Use a fine detail brush or dotting tool to add simple snowflake designs
- You can use white nail art polish or silver for extra sparkle
- Finish with a glossy top coat
The key here is keeping the snowflakes small and delicate. You don’t need to be a nail artist—simple lines and dots arranged in a star pattern will do the trick. This is one of the most elegant holiday nails that works for any occasion.
4. Deep Burgundy with Gold Striping
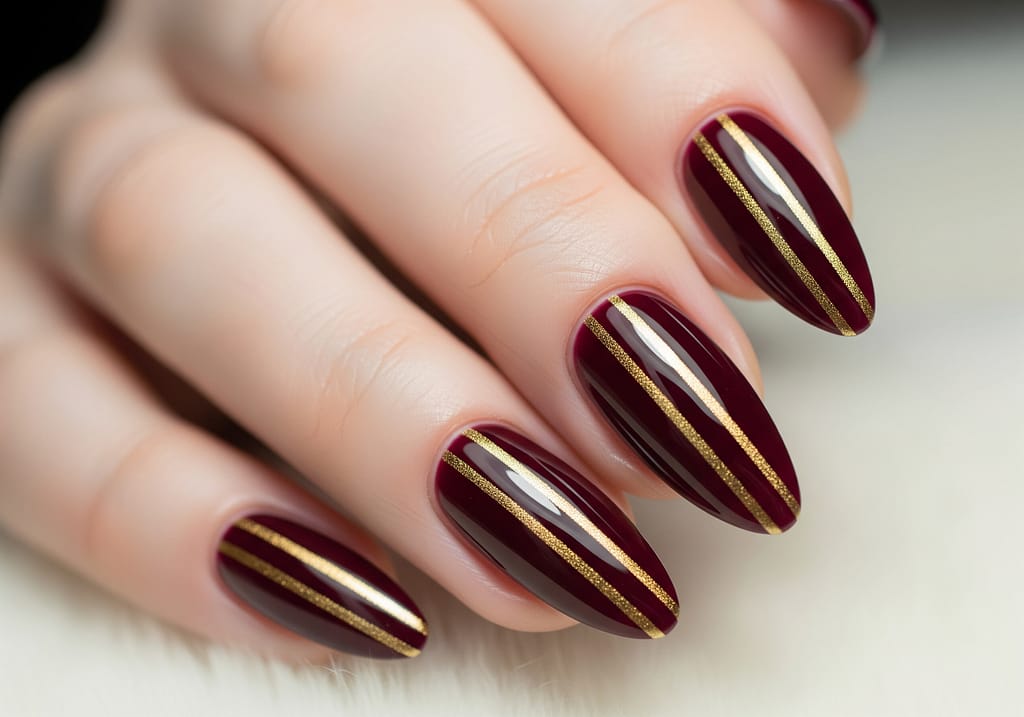
There’s something incredibly luxurious about deep burgundy paired with metallic gold. This color combination screams sophistication and holiday elegance.
How to achieve this look:
- Paint nails with a rich burgundy or wine-colored polish
- Once dry, apply thin gold striping tape vertically or diagonally
- Press down firmly and seal with top coat
- Alternatively, use a thin brush with gold polish to create freehand lines
The contrast between the deep, vampy red and the bright metallic gold creates serious visual impact. It looks like custom nail art but takes minutes to create.
5. Silver Glitter Gradient

A glitter gradient is easier than it looks and creates that expensive, salon-quality ombré effect. Silver glitter is perfect for Christmas and catches the light beautifully.
How to achieve this look:
- Start with a clear or natural beige base coat
- Apply silver glitter polish heavily at the tips
- Using a makeup sponge, dab and blend the glitter toward the base of the nail
- Layer until you achieve your desired gradient
- Seal with a thick glossy top coat to smooth the texture
This technique looks incredibly professional but costs just a few dollars in supplies. The metallic shimmer makes it perfect for evening holiday events.
6. Glossy Candy Cane Stripes

Nothing says Christmas quite like candy canes! This playful design looks expensive when you use a high-gloss finish and keep the lines clean.
How to achieve this look:
- Paint nails with white polish as your base
- Use striping tape or a thin brush to create diagonal red stripes
- Apply 2-3 coats of high-gloss top coat for that glass-like finish
The secret to making this look expensive is the glossy finish. That glass-like shine elevates even the simplest design. It’s festive, fun, and totally Instagram-worthy.
7. Champagne and White Marble

Marble nails have that expensive, stone-like appearance that looks incredibly high-end. Using champagne and white creates a soft, sophisticated holiday look.
How to achieve this look:
- Apply champagne or light gold polish as your base
- While slightly wet, add drops of white polish
- Use a thin brush or toothpick to swirl the colors together
- Don’t over-mix—you want distinct veining like real marble
- Seal with glossy top coat
This technique is forgiving because marble is naturally irregular. “Mistakes” actually make it look more authentic and luxurious.
8. Emerald Green with Rose Gold Details

Emerald green is such a rich, jewel-toned color for the holidays, and pairing it with rose gold creates an unexpected, modern twist.
How to achieve this look:
- Paint nails with a deep emerald green polish
- Add rose gold accents using a dotting tool or thin brush
- Try simple dots, triangles, or a single rose gold stripe
- Finish with top coat
The combination of green and rose gold feels fresh and current while still being festive. It’s perfect for those who want elegant holiday nails with a modern edge.
9. Simple Christmas Nails: Nude with Gold Dots

Sometimes less is more. This minimalist design is perfect for those who want festive nails that work in professional settings too.
How to achieve this look:
- Apply a nude or soft beige polish as your base
- Use a dotting tool to add small gold dots randomly across each nail
- Vary the sizes for visual interest
- Seal with glossy top coat
These simple Christmas nails are understated yet festive. The gold adds just enough sparkle for the holidays without being overwhelming. Perfect for everyday wear throughout December.
10. Black and Gold Geometric Design

For something more dramatic and editorial, black and gold creates serious impact. This color combination always looks expensive and modern.
How to achieve this look:
- Paint nails with black polish
- Use striping tape or a thin brush to create geometric patterns in gold
- Try chevrons, triangles, or intersecting lines
- Seal with top coat
The high contrast between black and metallic gold creates a luxury feel. It’s bold enough for holiday parties but sophisticated enough to feel grown-up.
11. Pearl-Studded Red Nails

Adding small pearl embellishments instantly elevates any manicure. Red and pearls together create a classic, expensive-looking combination.
How to achieve this look:
- Paint nails with classic red gloss polish
- While the top coat is still tacky, place small nail pearls (available at craft stores)
- Use tweezers for precise placement
- Apply another layer of top coat around the pearls to secure
The three-dimensional element of pearls adds texture and dimension that photographs beautifully. It looks like custom nail art but costs under $5 in supplies.
12. Icy Blue Snowflake Masterpiece

For a frosty, winter wonderland vibe, icy blue with intricate snowflakes creates magic. This design captures the elegance of a snowy Christmas.
How to achieve this look:
- Paint nails with pale blue or silver polish
- Use a fine detail brush or nail art pen to create snowflake designs in white
- Add tiny dots of silver glitter at the center of each snowflake
- Finish with glossy top coat
The metallic and glitter elements catch the light beautifully, while the snowflakes add that special Christmas touch. It’s winter elegance at its finest.
Tips for Making Any Design Look More Expensive
No matter which Christmas nail design you choose, these tips will help elevate your at-home manicure:
- Invest in a good base and top coat: These create the foundation for long-lasting, glossy nails
- Prep your nails properly: Push back cuticles, file nails to the same length and shape
- Clean up edges: Use a small brush dipped in nail polish remover to clean up any mistakes around the cuticles
- Apply thin layers: Multiple thin coats look better than thick, goopy ones
- Use metallic accents: Gold, silver, and chrome finishes instantly look luxurious
- Choose glossy over matte: High-shine finishes photograph better and look more polished
- Moisturize cuticles: Well-moisturized cuticles make any manicure look professional
Final Thoughts
The secret to expensive-looking Christmas nail designs isn’t the price tag—it’s all about the finish, the details, and the execution. With these 12 designs, you have plenty of options from bold and dramatic to simple Christmas nails that work for any occasion.
Metallics, high-gloss finishes, and delicate details like snowflakes are your best friends when creating elegant holiday nails at home. Most of these designs use supplies you might already have, and the ones you need to buy are incredibly affordable.
This holiday season, treat yourself to beautiful nails without the salon prices. Your festive fingertips will look amazing in photos, at parties, and while wrapping presents. Which design will you try first?
Happy holidays and happy painting! 🎄✨


